CARBURETTOR
The motor carburettor is adjusted for best performance at the factory in Italy, however due to the numerous variations associated with different geographical locations is would be prudent for the engine to be tuned at its final destination or main flying location. Please ensure that this operation is done by the Miniplane distributor from whom you purchased. Alternatively it is possible (but not preferable) for a qualified mechanic who is experienced with 2 stroke motors. It should be noted that this situation is not preferable as most 2 stroke experienced persons/mechanics are not experienced in high HP, high performance 2 stroke engines, and through ignorance may cause more problems that cure.
Engine “RICH MIXTURE” will cause excessive fuel consumption and engine vibration.
Engine “LEAN MIXTURE” will cause the motor to run hotter than normal, and may under severe conditions cause, the piston to seize in the bore. Lean carburettor mixtures have also been associated with: Holing of the piston and “softening” of the pistons crown which leads to its collapse due to the extreme heat generated by the lean mixture.
Run the engine for about 10 min. at 75% + power, this will cause the spark plug to be coated in fuel combustion gas deposits. This is the Ultimate way to verify the correct fuel mixture ratio. The correct acceptable colour of which is, anywhere from light coffee colour to dark a chocolate colour.
|
|
The spark plug colour range is: |
Grey |
Tan / Clean centre |
Dark Brown / Black |
| Therefore carburettor screw is : |
Lean ( lean, insufficient fuel ) screwed IN to far |
correct |
Rich ( too much fuel ) screwed OUT to far |
|
PLEASE NOTE : on 2002 in Europe was introduce the "green" unleaded gasoline, after that the plug colour don't garantee the correct carburation !
other solution for a correct setting are in our web catalog www.miniplane.net/shop : EGT (exaust) temperature, CHT under plug temperature, or a special instrument that analize the oxigene concentration, but before all a lot of experience, please contact the nearest dealer.
Carburettor diaphragm
To work correctly the carburettor diaphragms should be maintained in a sealed wet state. After numerous hours of operation of or where it is believed that the diaphragms have been in a dry carbie for a substantial period – it is recommended that a diaphragm repair kit M10V5 or full kit M10V5K be installed to ensure optimum performance. Contact your dealer if in doubt. After long period of inactivity it is possible that the diaphragm has dried out due to fuel evaporation, this in itself is enough reason alone to change the diaphragms
The replacement of the diaphragm is recommended annually. As with all things - they wear. Associated with wear of the diaphragm is a decrease in pump performance, which is turn effects fuel mixture ratio. The failure to replace the diaphragm will cause a degrading of pump performance, and a leaning out of the mixture ratio, resulting in possible engine seizure.
Changes to the mixture setting may also be necessary due to season changes / altitude variation (+ - 500 m from previous location). This may be performed by persons comfortable with the function of the engines operation or alternatively by you dealer.
Symptoms of a RICH ‘high’ screw & or a LEAN ‘low’ fuel mixture screws
| “L” screw set to lean: ( screwed in to far ) |
It may idle well BUT will not accelerate. Acceleration causes the engine to die. |
| “H” screw to rich : ( screwed out to far ) |
If left to idle for 2-3 minutes - engine “loads up” with excessively “wet” (rich) mixture and dies. Fuel pools at the bottom of the engine cases, when accelerating the engine in this state – you will get a rumbling sound and excessive smoke as engine attempts to clear pooled fuel. |
VALBRO
 The
Valbro carburettor used has a cold start function (choke ) for cold climate,
and initial start procedure.
Lever ‘A” in position 2 for starting, in position 1 for normal operation.
On MINIPLANE delivered after august 2008 there is a remote choke control: position pushed down is for starting 2 , pulled up is position 1 for normal operation .
All the machine with valbro carburator can be upgraded , visit our web shop.miniplane.it
THIS CARBURATOR DOESN'T HAVE THE 2 SETTING SCREWS "LOW" AND "HIGH"
The carburettor has an idle adjustment screw (‘D’) (idle speed screw) which has a tapered base. This tapered base acts upon the carburettors butterfly valve. Adjustment of the engines idle speed is made by rotation of this screw ‘D’. Turning the screw into the carburettor will open the butterfly valve inside the carburettor – increasing the engines idle speed.
The screw D has no effect upon carburettor fuel settings.
Screw (‘C’) is the main fuel mixture screw and is responsible for engine fuel mixture at engines speeds around middle rpm. Turning this screw (‘C’) OUT of the carburettor enriches the mixture. The optimum setting for this screw is between 1 and 2 + 1/2 turns from closed.
# NOTE – when closing the fuel screws do so gently – DO NOT seat the screws hard into the carburettor body, or you will damage the fuel passage that the screws locate into #
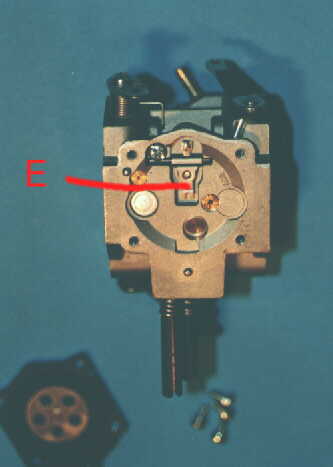
Behind cover B is located the fuel metering mechanism – the fuel spring, THIS IS THE ENGINES MAIN FUEL CONTROL MECHANISM. When the cover is removed you will see the lever (E) beneath which is located the fuel spring. The ideal length of this spring is between 14-15mm. This length can be obtained by gently squeezing the spring between your fingers.
A new "miracle spring" is now available on Per Il Volo web shop (gold color spring) as it is softer than standard one it gives better high range fuel delivery. see in our shop : shop.miniplane.it
This fuel spring length should give you a “Pop Off Pressure” of 0.9/1 Bar. As an indication of the importance of this calibration – a specific tool is available (you see photograph under ) for measuring the point at which the pop off pressure is achieved. The tool is available from the Per Il Volo web shop.
article MANUTC see shop.miniplane.it
 |
The height of the lever upon which the spring acts, is also critical and should be 0.5 -0.7 mm above the body of the carburettor ( measured from the inside flat surface near the lever, that is easy to measure) |
 |
If you use a dept capiler
you may measure from the flat surface around
the carburator as on the picture. in this case the distance must be between 1 to 1,2 mm. |
The adjustment of the fuel lever and fuel spring is a very delicate operation, involving fragile components and should only be undertaken by an expert.
The carburettors fuel filter is also located here, and can become blocked with “rubbish” causing a loss of power which is especially prevalent at high rpm’s
