In an area with at least 7 ft. of free space for each side, do assemble the guarding cage on the frame following the arrangements here described: TO DISASSEMBLE IT DO PROCEED IN
THE OPPOSITE ORDER |
|
In an area with at least 7 ft. of free space for each side, do assemble the guarding cage on the frame following the arrangements here described: TO DISASSEMBLE IT DO PROCEED IN
THE OPPOSITE ORDER |
|
| assem_ bling |
OPERATIONS |
disas_ semb_ ling |
|
| 1 |
screw the higher spokes A (the thicker ones) on the central part of the protection sheath.
|
11 | |
| 2 |
Insert the higher spokes A into the frame, setting the net outward (in front while in flight) and do fix them in position by the clips screw the side stiks B to the frame ( also setting the net outward )
|
10 | |
| 3 |
If you miss to reach the end of the housing, besides hampering the right assembling, may break the bars and the bushes too.
Do pay particular attention also when inserting the outer bars so to have each one aligned with the previous one
If properly inserted, the sheath must cover almost the full length of the bars, leaving out only 1-1,5 inches ( the part covered by a 12mm plastic bush) ; should it be not the case before going on do verify the correct insertion of the bars (you can be sure to have reached the bottom of the housing if you hear a kind of "tock" sound)
|
9 | |
|
|
|||
| 4 |  Bend
the arc and insert it on the base of the frame (C point) , each
side at a time. Bend
the arc and insert it on the base of the frame (C point) , each
side at a time.To perform correctly this operation is necessary first to find a position that allows a continuous and complete movement. To compensate the remarkable thrust of the arc, which otherwise could turn over the paramotor, it is necessary to lay a foot on a support tube of the frame and holding it with the help of a hand. In order to insert the arc well on the base of the frame it is necessary to align with care the fiber bar and its housing in the frame before forcing it uselessly, with the help of your elbow leaned inside the arc to reach the right bending (your hand is not strong anought).
To perform again this operation it will be
necessary to look for a better position that allows the complete
movement. |
8 | |
| 5 | 
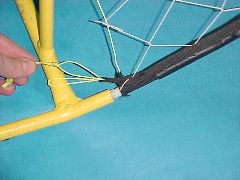
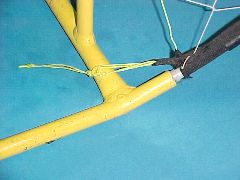
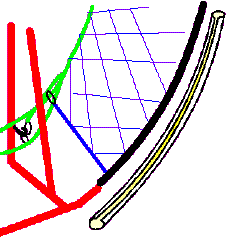
Do fasten the tip of the sheath to the frame hooking the tension wire that must pass two times around the fixing pole D |
7 | |
 |
 |
||
| 6 |
The outward tips of the spokes must only be inserted into the joints. The T joints in the sheath are provided with little teeth that hamper the spokes slipping off . To disassemble
|
6 | |
| 7 | Before stretching the guarding net, check its edges, during the
shifting the meshes may get easily knotted. Do gradually tend the tension string verifying the regular shaping of the net, do fix the 1st. ring to its hook E after having it crossed under the fuel tank, passing before the frame's diagonal tube.
Do pass the tip around the tending string coming from the opposite side and couple the 2nd. ring to its hook (see the drawing) You can stretch more the net by making two turns of this kind before coupling the 2nd. ring
A short video here : Per Il Volo channel You can pull the string until it gets difficult to misshape the net. should you find too difficult to assemble the net, or if it does not stretches do modify the tension string as specified in: CONTROLS. when you will disassemble remind to screw the small
carabiners |
5 | |
| 8 |
Do insert the harness spacers in the frame, passing outward the dorsal and specially to the belt of the shoulder pads arranged on the frame do bock . Block them by the supplied suitable click pin . The outer position allows a better flight position for robust pilots, the inner one is suitable for a lighter pilot while taking off and landing. In changing the harness spacers you must also change the harness settings. check for the correct hooking of spring-catches to the wing. (go to HARNESS SETTINGS )
|
4 | |
| 9 |
Refueling must be relevant to the time of the flight. Should you take down the fuel tank pay attention to the suction lift. Avoid dusting or dirt it, don't lean it to the ground! Dust may enter the circuit and could damage the pump or the carburetor. Do fit the fuel tank replacing the little cap used for shifting with with the circuit one provided with the suction pipe, in case the fuel tank is provided with a rigid suction pipe verify its correct insertion and orientation towards the tank's left corner. Circuit pipes are longer than necessary to allow the disassembling of the fuel tank, when reassembling it, do pay attention not to squeeze them and check for the engine's vibrations not to push them close to the muffler, better if the stay before the vent pipe.
Do open the tap (if any). |
3 | |
| 10 | 
Insert the sliders in the lower part of the prop's guarding arch. Make sure the protection slides on the tube to the complete covering of it; avoid the formation of leaps. This protection is to facilitate the sliding of the strings while inflating the wing, reducing friction and wear. |
2 | |
| 11 |
the prop must be at the right distance from each part of the frame and cage, the clearence from the tip must be about 7 / 8 cm, if some places are too near or too far this can means that you damage the machine durying the transport or durying the last flight.
always verify the complete machine before to start the engine, please follow a ceck list
|
1 | |
| assem_ bling |
OPERATIONS |
disasas_ sembling |
|
how to hold the AIR BOX
HARNESS ASSEMBLING AND SETTING:
please take a look to the
manual page
![]()
SHIFTING
|
The Miniplane can enter the trunk of many cars even the little ones. Avoid strikes. A new transport box is availlable for 2001 frame: (click on image) |
 |
If you don't need to use the transport
box .
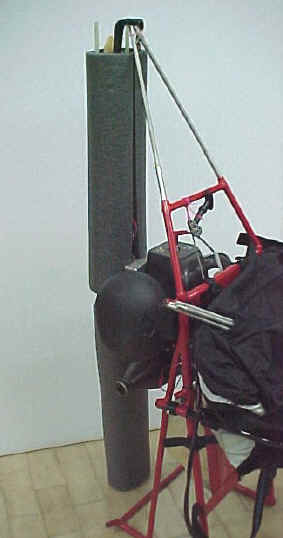
You can use the same foam tube used on transport for protect the prop and the cage/net togather. |
If your miniplane is supplied with a float-type carburetor, it must be shifted horizontally, provided the disassembling of the float chamber that can by done by unscrewing it fro the bottom (pay attention to correctly reassemble the float and gasket) or better start the engine with the gas tap shut the time necessary to consume the gas (2/3 minutes).
The fuel tank must be removed and sealed.
It is necessary to empty the gas circuit.
You can perform the disassembling following the opposite order of assembling and the same precautions.
While cleaning the Miniplane before the shifting you can check the strength of the parts under strain.
You must clear the propeller before each shifting, oil from exhaustion gases may enter the varnish and imbibe the wood causing an aerodynamic imbalance.